


Build Your Dream Tabletop Shuffleboard with Custom Scoring Zones
Tired of the same old game night? Elevate your entertainment with a custom-built tabletop shuffleboard! This detailed guide walks you through creating your own unique game, complete with personalized scoring zones. Get ready to unleash your creativity and build a game that reflects your personal style.
Gathering Your Materials: A Foundation for Fun
Before you dive into the exciting construction phase, gather all the necessary materials. This ensures a smooth and efficient building process. Don’t rush this step; having everything prepared beforehand will save you valuable time and frustration later. Here's what you'll need:
- A sturdy wooden board: Choose a board that’s long enough for your desired playing area (at least 4 feet is recommended). Plywood works well, offering a good balance of strength and affordability. Consider the thickness carefully; a thicker board provides more stability and durability.
- Wood stain or paint: Personalize your shuffleboard with your favorite color or finish. Choose a durable option that can withstand regular play.
- Sandpaper (various grits): Sanding is crucial for a smooth playing surface. Start with a coarser grit to remove imperfections and finish with a finer grit for a flawless feel.
- Shuffleboard pucks (weights): Select pucks that are appropriately sized and weighted for your tabletop shuffleboard dimensions. Experiment with different weights for your personal preference.
- Finishing wax or sealant: Protect your beautifully crafted shuffleboard from scratches and spills with a high-quality finish. This ensures longevity and preserves its aesthetic appeal.
- Measuring tape, pencil, and saw: These are essential for precise cuts and measurements throughout the construction process.
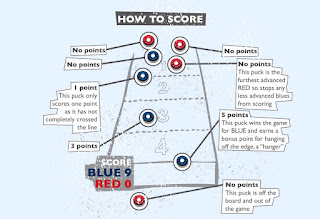
- Optional: Custom scoring zone materials: This could include paint, stencils, inlaid wood, or even small metallic markers. Let your imagination run wild!
Constructing the Shuffleboard: A Step-by-Step Guide

Preparing the Playing Surface
Begin by carefully sanding the wooden board. Start with a coarser grit sandpaper to remove any imperfections or rough spots. Gradually move to finer grits for an increasingly smooth surface. This meticulous sanding ensures the pucks glide effortlessly across the playing area, enhancing the game's enjoyment.
Creating Custom Scoring Zones
Now for the fun part! Design your custom scoring zones. Use a pencil to lightly sketch out your design on the board. You can create traditional scoring zones, or get creative with unique shapes and point values. Remember to consider the placement of the zones to balance the gameplay challenge. Once you’re happy with your design, carefully paint or apply your chosen materials to create the scoring zones. Allow ample drying time before proceeding.
Applying the Finish
Once your scoring zones are completely dry, apply your chosen finish (wax or sealant) to protect the board. Apply several thin coats, allowing each coat to dry completely before applying the next. This step not only protects the wood but also provides a smooth playing surface for optimal puck movement.
Adding the Finishing Touches: Elevating Your Game
With the main construction complete, add those special touches that make your shuffleboard truly unique. Consider adding felt or rubber bumpers to the sides to prevent pucks from bouncing off. You could also create a custom base for the board, perhaps adding legs or feet for better stability and elevation. Let your creativity guide you in these final stages!
Enjoy Your Custom Tabletop Shuffleboard!
Congratulations! You’ve successfully built a one-of-a-kind tabletop shuffleboard with custom scoring zones. Now gather your friends and family, and get ready for hours of fun and friendly competition. Remember to adjust the rules based on your custom scoring system and enjoy your unique creation!

