Offering woodworking tutorials, project inspiration, and tips from an experienced carpenter’s perspective.

Saturday, 1 February 2025

Storage Chest Woodworking Plans for Your Home

Craft a Custom Storage Chest: Detailed Woodworking Plans for Your Home

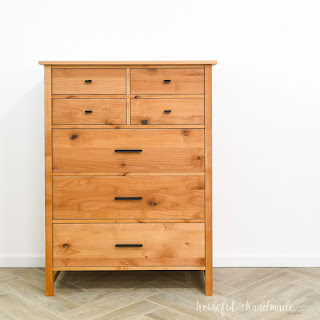
Tired of clutter piling up and stealing valuable space in your home? A handcrafted storage chest offers a beautiful and practical solution. This detailed guide provides you with the woodworking plans to build your own unique chest, transforming a storage problem into a stunning piece of furniture. Forget generic, mass-produced storage solutions – you'll create a heirloom-quality chest perfectly tailored to your needs and style. Prepare to enjoy the process of creating something beautiful and functional, while simultaneously conquering the storage chaos in your home.

Planning Your Perfect Storage Chest

Before you reach for your tools, careful planning ensures a successful project. Begin by determining the desired dimensions of your chest. Consider the space where it will reside and the items you intend to store. A larger chest demands more materials and time, while a smaller chest might lack the desired storage capacity. Sketch your design on paper, noting precise measurements for the base, sides, lid, and any decorative elements you envision. Selecting the right wood type is crucial. Hardwoods like oak, cherry, or walnut offer durability and a rich aesthetic, but softer woods like pine are more budget-friendly and easier to work with for beginners. Finally, create a detailed materials list, ensuring you purchase enough wood, screws, hinges, and any other necessary hardware.

Choosing Your Wood and Hardware

The choice of wood significantly impacts the final look and feel of your storage chest. Oak provides strength and a classic look, while cherry offers warm tones and a beautiful grain pattern. Walnut exudes luxury and sophistication. If cost is a primary factor, pine remains a viable option, although it requires more care to avoid dents and scratches. For hardware, select hinges that match your aesthetic preference. Consider using sturdy, heavy-duty hinges designed to withstand frequent opening and closing. Matching handles or pulls will further enhance the chest's visual appeal. Consider adding decorative elements like brass accents for an antique feel or modern, minimalist handles for a contemporary look. Plan these choices carefully, as they significantly affect the overall design.

Constructing the Storage Chest: A Step-by-Step Guide

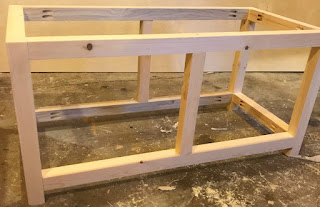
With your plans finalized and materials gathered, you're ready to begin construction. Start by carefully cutting the wood according to your precise measurements. Use a high-quality saw to ensure clean, accurate cuts. Assemble the base by joining the four sides using wood glue and screws. Clamp the pieces firmly to ensure a secure bond while the glue dries. Once the base is assembled, construct the sides and attach them to the base. Remember to use precision and double-check your measurements at each stage. The lid should be slightly larger than the chest opening to allow for proper closure. Attach hinges securely to the lid and the chest's top edge, ensuring they are positioned correctly for smooth operation.

Adding Finishing Touches

Once the chest's structure is complete, sand all surfaces to achieve a smooth finish. Begin with coarser grit sandpaper, gradually moving to finer grits for a flawless surface. Apply a wood finish – stain, paint, or varnish – according to your chosen aesthetic. Multiple coats may be necessary for optimal protection and depth of color. Allow ample drying time between coats. Finally, attach the handles or pulls, ensuring they are securely fastened and properly aligned. A coat of wax or paste wax can enhance the final look and add protection against scratches and spills. Remember to let the final finish cure completely before placing items into the chest.

Beyond the Basics: Personalizing Your Creation

Don't limit yourself to the basic design. Consider adding personalized touches to truly make the chest your own. Inlay decorative wood or metal accents to elevate its visual appeal. Consider adding a custom engraved plaque with your initials or a significant date. Perhaps integrate hidden compartments or secret drawers for added intrigue and security. The possibilities are as limitless as your creativity. Experiment with different wood stains and finishes to achieve unique colour effects. Adding decorative trim or molding can add an extra layer of sophistication. Remember, this is your project; let your creativity shine through!

Building your own storage chest is a rewarding experience. The satisfaction of creating a functional and beautiful piece for your home is unparalleled. Enjoy the process, embrace the challenge, and proudly display your handcrafted masterpiece.

Share:

Organize Your Home with Elegant Dresser Woodworking Plans

Organize Your Home with Elegant Dresser Woodworking Plans

The allure of handcrafted furniture extends far beyond mere aesthetics. A meticulously crafted dresser, built with your own hands, offers not only a statement piece for your home but also a deeply satisfying experience of creation and a solution to often-overlooked organizational challenges. This article delves into the intricate world of dresser woodworking plans, providing comprehensive guidance for aspiring artisans seeking to construct an elegant and functional addition to their living space.

Choosing the Right Dresser Design

Before embarking on the construction process, careful consideration must be given to the dresser's design. Numerous styles exist, each offering distinct advantages and demanding varying levels of woodworking expertise. The choice should reflect not only personal aesthetics but also the available space, the intended purpose, and the builder's skill level.

Traditional Styles: A Timeless Appeal

Traditional dresser designs, characterized by their classic lines and ornate detailing, often incorporate features like intricate carvings, multiple drawers of varying sizes, and robust construction methods. These designs, while visually stunning, typically require advanced woodworking skills and meticulous attention to detail. Popular examples include:

  • Queen Anne style: Featuring cabriole legs, shell carvings, and often a serpentine front.
  • Chippendale style: Known for its bracket feet, ball-and-claw feet, and sometimes incorporating Chinese-inspired motifs.
  • William and Mary style: Distinguished by its use of architectural details, such as turned legs and bun feet.

The intricacy of these styles demands a high level of precision and an understanding of traditional joinery techniques. Detailed plans, potentially obtained from reputable woodworking resources or books dedicated to antique furniture reproduction, are essential for successful completion.

Modern Styles: Clean Lines and Functionality

In contrast to traditional designs, modern dresser styles prioritize clean lines, minimalist aesthetics, and often incorporate innovative storage solutions. These designs can be easier for beginners to construct, relying on simpler joinery and readily available materials. Popular examples include:

  • Mid-century modern: Characterized by tapered legs, simple geometric forms, and often the use of solid wood or veneer.
  • Minimalist: Emphasizing functionality and simplicity, with a focus on clean lines and a lack of ornamentation.
  • Scandinavian style: Incorporating natural materials, light colors, and a focus on functionality and practicality.

Modern dresser plans often utilize techniques such as dado joints, rabbet joints, and pocket hole joinery, which simplify the construction process while maintaining structural integrity. Numerous online resources and woodworking books offer detailed plans for these styles.

Selecting Materials and Tools

The choice of materials significantly impacts the final product's quality, durability, and aesthetic appeal. Solid wood, such as oak, maple, cherry, or walnut, provides superior strength and longevity, although it typically commands a higher price. Plywood offers a more budget-friendly alternative, exhibiting good strength-to-weight ratio, but may require careful attention to edge finishing.

The selection of appropriate woodworking tools is equally crucial. A well-equipped workshop significantly enhances efficiency and precision. Essential tools include:

  • Table saw: For accurate cutting of lumber to size.
  • Planer: For creating smooth, even surfaces on lumber.
  • Jointer: For achieving perfectly flat and straight edges.
  • Router: For creating decorative edges, dadoes, and rabbets.
  • Drill press: For precise drilling of holes for dowels, screws, and other fasteners.
  • Sanding tools: Including various grits of sandpaper and a random orbital sander.
  • Clamps: To hold pieces securely during assembly.
  • Finishing tools: Brushes, rags, and spray equipment for applying finishes.

Beyond these essential tools, specialized tools may be required depending on the chosen dresser design and the complexity of the joinery involved. Carefully reviewing the woodworking plans beforehand will identify any additional tools needed.

Detailed Construction Process: A Step-by-Step Guide

The construction process can be broken down into several distinct phases. While the specific steps will vary based on the chosen design and plans, a general outline includes:

1. Planning and Preparation:

Begin by carefully studying the woodworking plans, understanding the dimensions, joinery techniques, and material requirements. Cut all lumber to the specified dimensions, ensuring accurate measurements to minimize errors later in the process.

2. Joinery:

Execute the chosen joinery techniques with precision. This phase is critical to the structural integrity of the dresser. Use appropriate tools and techniques to create strong, durable joints.

3. Assembly:

Carefully assemble the dresser components, following the instructions outlined in the woodworking plans. Use clamps to hold pieces securely in place while glue dries and screws are tightened.

4. Finishing:

Once the dresser is assembled, sand all surfaces smooth, ensuring a consistent finish. Apply your chosen finish – be it paint, stain, or varnish – according to the manufacturer's instructions. Multiple coats are typically recommended for optimal durability and aesthetic appeal.

5. Hardware Installation:

Install the chosen drawer pulls, knobs, and any other hardware, ensuring that they are aligned and securely fastened.

Beyond the Basics: Enhancing Your Dresser

Once you have mastered the fundamental construction techniques, consider adding unique features to personalize your creation:

  • Intricate carvings: Add decorative carvings to the dresser's front or sides using appropriate tools and techniques.
  • Inlays: Incorporate contrasting wood species or other materials to create visually appealing inlays.
  • Custom drawer dividers: Design and build custom drawer dividers to optimize storage and organization.
  • Unique hardware: Choose distinctive drawer pulls and knobs to enhance the dresser's aesthetic appeal.

The possibilities are virtually limitless. Let your creativity guide you in crafting a truly unique and personalized dresser.

Conclusion: A Legacy of Craftsmanship

Building a dresser from woodworking plans is a rewarding endeavor that combines artistry, craftsmanship, and practical problem-solving. The process not only yields a beautiful and functional piece of furniture but also fosters a deeper appreciation for woodworking as a skill and a creative outlet. With careful planning, meticulous execution, and a touch of personal flair, you can craft a dresser that will serve as a testament to your skill and a cherished addition to your home for years to come.

Share:

Saturday, 25 January 2025

How to Build a Tabletop Shuffleboard with Custom Scoring Zones

Build Your Dream Tabletop Shuffleboard with Custom Scoring Zones

Tired of the same old game night? Elevate your entertainment with a custom-built tabletop shuffleboard! This detailed guide walks you through creating your own unique game, complete with personalized scoring zones. Get ready to unleash your creativity and build a game that reflects your personal style.

Gathering Your Materials: A Foundation for Fun

Before you dive into the exciting construction phase, gather all the necessary materials. This ensures a smooth and efficient building process. Don’t rush this step; having everything prepared beforehand will save you valuable time and frustration later. Here's what you'll need:

  • A sturdy wooden board: Choose a board that’s long enough for your desired playing area (at least 4 feet is recommended). Plywood works well, offering a good balance of strength and affordability. Consider the thickness carefully; a thicker board provides more stability and durability.
  • Wood stain or paint: Personalize your shuffleboard with your favorite color or finish. Choose a durable option that can withstand regular play.
  • Sandpaper (various grits): Sanding is crucial for a smooth playing surface. Start with a coarser grit to remove imperfections and finish with a finer grit for a flawless feel.
  • Shuffleboard pucks (weights): Select pucks that are appropriately sized and weighted for your tabletop shuffleboard dimensions. Experiment with different weights for your personal preference.
  • Finishing wax or sealant: Protect your beautifully crafted shuffleboard from scratches and spills with a high-quality finish. This ensures longevity and preserves its aesthetic appeal.
  • Measuring tape, pencil, and saw: These are essential for precise cuts and measurements throughout the construction process.
  • Optional: Custom scoring zone materials: This could include paint, stencils, inlaid wood, or even small metallic markers. Let your imagination run wild!

Constructing the Shuffleboard: A Step-by-Step Guide

Preparing the Playing Surface

Begin by carefully sanding the wooden board. Start with a coarser grit sandpaper to remove any imperfections or rough spots. Gradually move to finer grits for an increasingly smooth surface. This meticulous sanding ensures the pucks glide effortlessly across the playing area, enhancing the game's enjoyment.

Creating Custom Scoring Zones

Now for the fun part! Design your custom scoring zones. Use a pencil to lightly sketch out your design on the board. You can create traditional scoring zones, or get creative with unique shapes and point values. Remember to consider the placement of the zones to balance the gameplay challenge. Once you’re happy with your design, carefully paint or apply your chosen materials to create the scoring zones. Allow ample drying time before proceeding.

Applying the Finish

Once your scoring zones are completely dry, apply your chosen finish (wax or sealant) to protect the board. Apply several thin coats, allowing each coat to dry completely before applying the next. This step not only protects the wood but also provides a smooth playing surface for optimal puck movement.

Adding the Finishing Touches: Elevating Your Game

With the main construction complete, add those special touches that make your shuffleboard truly unique. Consider adding felt or rubber bumpers to the sides to prevent pucks from bouncing off. You could also create a custom base for the board, perhaps adding legs or feet for better stability and elevation. Let your creativity guide you in these final stages!

Enjoy Your Custom Tabletop Shuffleboard!

Congratulations! You’ve successfully built a one-of-a-kind tabletop shuffleboard with custom scoring zones. Now gather your friends and family, and get ready for hours of fun and friendly competition. Remember to adjust the rules based on your custom scoring system and enjoy your unique creation!

Share:

DIY Kitchen Cutting Board Design for Beginners

Craft Your Dream Cutting Board: A Beginner's Guide

Tired of boring, generic cutting boards? Yearning to unleash your inner artisan? This guide walks you through creating a stunning, personalized cutting board, perfect for your kitchen and a fantastic gift for friends and family. No prior woodworking experience is necessaryâ€"we'll navigate each step together, ensuring a rewarding and enjoyable crafting experience.

Choosing Your Materials: The Foundation of Your Masterpiece

The beauty of a DIY cutting board lies in the customization. You get to choose the wood, the size, and even add decorative elements. For beginners, we recommend using readily available hardwoods like maple, cherry, or walnut. These woods are durable, relatively easy to work with, and offer beautiful grain patterns. Avoid softwoods like pine, as they're more prone to scratches and damage. Consider the following:

Wood Selection:

  • Hardwoods: Maple (light and bright), Cherry (rich reddish-brown), Walnut (dark and luxurious).
  • Thickness: Aim for at least 1 inch thick for stability and durability. Thicker boards are more resistant to warping.
  • Size: Start with a manageable size, perhaps 12" x 15". You can always make larger ones later!

Source your wood from a local lumberyard or home improvement store. Ensure the wood is properly dried to prevent warping and cracking during the crafting process.

Tools and Preparation: Gathering Your Arsenal

Before you dive into the creative process, ensure you have the necessary tools. This project doesn't require an extensive collection; a few essential items will suffice. Safety is paramount, so wear safety glasses throughout the project.

Essential Tools:

  • Circular saw or hand saw: To cut the wood to your desired size.
  • Sandpaper (various grits): Starting with coarser grits (like 80) and moving to finer grits (like 220) for a smooth finish.
  • Wood glue: For creating a multi-wood cutting board (optional).
  • Clamps: To hold pieces together while the glue dries (if gluing multiple wood pieces).
  • Mineral oil or cutting board oil: To finish and condition the wood.
  • Measuring tape and pencil: For accurate measurements and marking.

Once you've gathered your tools, carefully measure and cut your wood to your chosen dimensions. Remember to account for any desired bevels or edges. Take your time and make precise cuts for a professional-looking result.

Finishing Touches: Bringing Your Vision to Life

Sanding is key to achieving a smooth, professional finish. Start with coarser sandpaper to remove any rough edges and gradually transition to finer grits for a silky smooth surface. After sanding, apply your chosen wood finish. Mineral oil is a popular and food-safe choice, offering natural protection and enhancing the wood's natural beauty. Apply several coats, allowing each coat to dry thoroughly before applying the next.

Finishing Techniques:

  • Sanding: Sand in the direction of the wood grain to avoid scratches.
  • Oil Application: Apply a thin, even coat using a cloth or brush. Wipe off excess oil.
  • Drying Time: Allow the oil to cure completely before using your cutting board.

Once the oil has cured, admire your handiwork! You've successfully created a beautiful, functional, and personalized cutting board, ready to grace your kitchen counter. Remember to hand-wash your creation to maintain its beauty and longevity.

Share:

Search This Blog

Powered by Blogger.

Pages